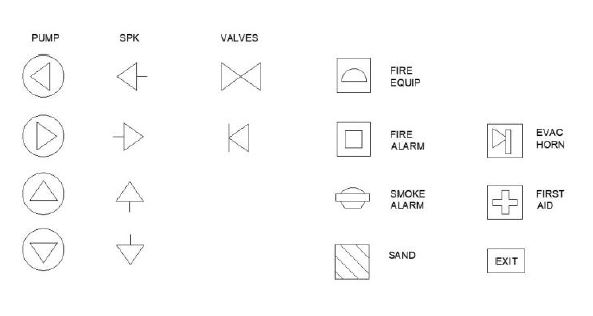
For Fire Detection and sprinkler systems drawings the best program to use is Autocad 2D. In our customized Autocad 2D training courses we guide the participants step-by-step through the whole process, from setting up a drawing to the printing or PDF export stage.
Here’s a summary of the process: first open up Autocad. Then click on the top left Application button, choose New then Drawing and double-click on your metric template of choice (dwt file). At this point a new drawing opens.
Building footprint:
First we draw up the building footprint. We can do so using the Rectangle tool (shortcut R). Autocad then asks you to specify the First Point of the rectangle – type 0,0 into the Dynamic Input beside the cursor and hit the Enter key. Next we specify the adjacent corner point – type in 20000,10000 and hit Enter. This will draw a room 20m x 10m, as shown on the screen grab right.
In this drawing we wish to add a smaller room on the South-East corner. We’ll use the Polyline tool for this (shortcut PL). First make sure that Ortho is turned on at the bottom Status bar. Note that the Polyline tool is good for multiple lines since it creates a single shape which can be offset later.
Now click on the bottom right corner and pull downwards. Type in 10000 and hit the Enter key. Next pull to the left and type 10000 and Enter. Then upwards by 5000 and Enter, to the right by 5000, and upwards again by 5000 and hit Enter. Finally hit Enter again to finish the command.
An alternate method would be to draw using one meter grid-lines. Click on the arrow beside the Snap & Grid on the bottom Status bar. Choose Snap Settings. Tick the check-boxes beside Snap On and Grid On. Then adjust the Spacing for Snap and Grid to 1000 (ie. 1 meter) and hit OK. This will set the grid for this drawing only. Now select the Polyline tool and click on the various lengths above – the cursor will snap to the 1 meter grid.
In either case we need to tidy up the drawing using the Trim tool (shortcut TR) (Mac: Modify > Trim). Then hit Enter to Select All (Mac: Return). And we then simply click on the lines we don’t want. This is the easiest method of using the Trim command.
Offset the walls:
Select the Offset tool (shortcut O) then specify the offset distance of 250 for a double-brick wall, and hit the Enter key. Then simply click on the walls, click outside the walls and hit Enter. Then hit the Escape key on the top left to deselect the Offset tool. To tidy up you may need to move the blue grips or use the Trim tool. Note that whether you click inside or outside of the shapes will depend on whether the measurements have been made inside the rooms or outside the building.
Sprinkler system pipes:
Select the Offset tool (O) again and specify the offset distance as 2000 (2m). As before, click on the walls and click inside the walls, hitting Enter to finish. Then hit the Escape key (top left) to deselect the Offset tool. As before move the blue grips and use the Trim tool if necessary. To move the pipes to a coloured layer select the lines and on the top Ribbon panel change from Layer 0 to a coloured one (for example red) using the drop-down
arrow. On a Mac platform we do this via the Properties panel. Next use the Line tool (L) to draw in any extra line-work.
Save the file:
At the top left Application button select Save and name it Floorplan-01.dwg.
Adding blocks:
Many Autocad users will collect their own specific blocks and save them into one file. There are several ways of importing these blocks into your floor-plan drawing. The easiest is via the Insert tab, choosing Insert and More Options, followed by Browse. Then navigate to your block drawing and choose the block. The drawback here is that if the blocks are saved to one drawing, then all those blocks will be imported. Some users therefore have blocks saved as separate drawings, making it easier to import just those you need.
Alternatively you could just open a blocks drawing, select the one you want, and hit CTL+C (to copy). Then return to your floor-plan drawing and hit CTRL+V (paste).
Next we use the Move (M) , Rotate (R) , Copy (CO) , and Mirror (MI) tools to adjust their positions. You can also space them out using the Array (AR) tool , and scale them if necessary via the Scale (SC) tool. Note that there are YouTube clips on how to use all these tools. Blocks may also be edited using the Block Editor (BE).
We could then add dimensions and text, and scale for printing in Paper Space, as we would for any other drawing – please see our other blog posts on these topics.
For more information on all features of Autocad 2D you can visit the AutoDesk website.
Also visit our Facebook page for more examples of our class work.
Other related Autocad 2d Blog Posts:

 Graphic Design Courses