The Knife tool is one tool among many for cutting up and dividing objects in Illustrator. We explore them all in our Adobe Illustrator courses.
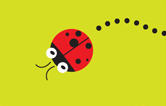
In the example here, we have used the Knife tool to help create the ladybird. After creating the body with the Ellipse tool – see another blog post on this tool – we cut it into two pieces using the Knife tool. If you can’t see the Knife tool on the toolbar, right-click on the Eraser tool to see the three associated cutting tools. Each of these is useful in different contexts. You can also click on the Tear Off symbol at the end of the fly out list to tear the tools off into a separate panel. Close this when you’re done.
First select the ellipse object with the Selection tool (the black arrow) – note that the tools will only work on selected objects. The top Eraser tool will cut a swathe through the object, the size of which is dependent on the Brush size. This can be altered either by double-clicking on the tool itself to reveal the options dialog box, or by simply hitting the square brackets beside the letter P on your keyboard – [ and ]. Then drag the cursor through the ellipse. In our case this is not the result we want, therefore Undo (Ctrl+Z).
Select the next tool in the list, the Knife tool. Again, with the ellipse selected, start dragging from outside the shape, move across the shape, and out the other side. This creates a clean cut through the shape. Use the Selection tool to then pull apart the two half-circle shapes. If you want a perfectly straight line, press Alt (Mac: Option button) as you drag across the shape. We can now change the colour of the front half to a red fill colour (no Stroke) and the back half to a black fill.
Note that you also have a third tool here, the Scissors tool. This works on lines only. Another set of cutting features are contained in the Pathfinder panel – see a related blog on this subject.
To finish the ladybird, we add a few ellipses for spots on the wings and the eyes. Then we use the Pen tool to create the antennae and the wing line along the back of the insect. And finally we’d group all objects together in order to move, scale or rotate them.
Whether you’re a complete beginner or self-taught, our courses will help you gain self-confidence in your Illustrator workflow, as well as adding to your professional skill-set. See many examples of our Illustrator clients’ work on our Facebook page.
Other related Illustrator Blog Posts:
Illustrator workspace
Illustrator basics
Illustrator clipping masks
Illustrator live trace
Illustrator brushes
Illustrator knife tool
Dec7

 Graphic Design Courses