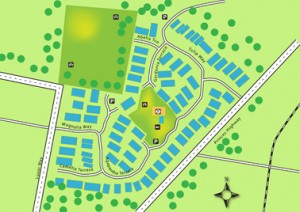
Creating maps using Adobe Illustrator is an easy process involving a few simple steps. We show you how in our Illustrator courses. 
First create a new document, A4 size for example. Then Place your reference image – this could be a map from Google Earth. Tick Template from the File > Place dialog box. This puts the image onto a locked, greyed-out layer, and also creates a tracing layer on top. Unlock and rescale if necessary. Rename the tracing layer Small Roads. Then use the Pen tool or Pencil tool to draw lines in the centre of each road – if using Pencil double-click on it first to change the Smoothness value to 100% > Black Stroke 1 pt.
Next create 5 more layers in ascending order named Parks, Big roads, Railway, Buildings, Text (note the text should be the top layer). Select all lines on the Small roads layer by clicking on the circle icon on the right of the layer label. Then go to the Appearance panel and note that the name of the Layer appears at the top of the panel. Change stroke weight to 7 pts. On the Options flyout > Add New Stroke > change to 4 pts > colour: White – this should change the appearance of all the lines selected.
Select the Main roads – note that Path appears at top of Appearance panel. Add 3 new strokes: bottom – 20 pt black, next is 16 pt white, then 1 pt black – make this last one a dashed line in Stroke panel: tick Dashed line > 6 pt dash > 8 pt gap. This can also be saved as a Graphic Style. Select any minor roads – 15 pt black > 12 pt white > 1 pt grey dashed > 3pt dash > 5 pt gap.
To create the Railway line select the line and add 2 strokes: 5 pt black > 2 pt white > 12 pt dash & 12 pt gap. This can also be saved as a Graphic Style. Next tidy up the intersections by moving the anchor points to overlap (with the White Arrow).
Select the Parks layer & add blocks of green with the Pen or Pencil tool – make sure this layer is below the roads layers. Use a Gradient or Gradient Mesh for the fill colours, or a Pattern from Swatch Libraries. For Buildings create a Rectangle 14 x 7 mm > drag into the Symbols panel and drag out as needed, or press Alt (Mac:Option) and Move to copy. Then Scale & Rotate each as needed. The advantage of creating the buildings as Symbols is that you can edit all at once by double-clicking in the Symbols panel to change the colour, size, etc. Also create symbols for Trees with the Ellipse tool and change the Opacity. Use the Symbol Sprayer tool to add many trees at once. Break the Link if you need to edit just one symbol.
Go to Symbol Libraries in the Options flyout – note the collection of Maps symbols – this contains many common map symbols like North Arrow, etc. For text make sure the text layer is the top layer in the Layers panel. For text on a path, first copy the road line, then paste into Text layer – it should turn into a line. Tidy up with the Path Eraser tool OR simply create a new line with the Pen or Pencil tool. Select the Type on a Path tool > click on the path & type the text.
Open Window > Type > Character > change the font > change the Tracking to 100 – this spreads it out a bit. You can also save this as a Character or Paragraph Style.
Lastly create a Clipping Mask to tidy up the artwork: create a Rectangle or Rounded Rectangle on top of all artwork > select all (Ctrl+A) > right-click > Make Clipping Mask. Finally, File > Save As: AI, EPS, PDF, or File > Export as: JPEG, TIFF, PNG.
Whether you’re a complete beginner or self-taught, our courses will help you gain self-confidence in your Illustrator workflow, as well as adding to your professional skill-set. See many examples of our Illustrator clients’ work on our Facebook page.
Other related Illustrator Blog Posts:
Illustrator workspace
Illustrator basics
Illustrator clipping masks
Illustrator live trace
Illustrator brushes
Illustrator map
Oct12

 Graphic Design Courses